0034. 使用 ctx.drawImage 实现人物奔跑动画效果
1. 📝 简介
- 能够理解任务的运动原理即可,本质上使用的是
ctx.drawImage的“截图”功能。
2. 💻 demo1 - 素材图片展示
html
<!-- 1.html -->
<!DOCTYPE html>
<html lang="en">
<head>
<meta charset="UTF-8" />
<meta name="viewport" content="width=device-width, initial-scale=1.0" />
<title>📝 实现人物奔跑动画效果</title>
</head>
<body>
<script src="./drawGrid.js"></script>
<script>
const canvas = document.createElement('canvas')
drawGrid(canvas, 500, 150, 50)
document.body.append(canvas)
const ctx = canvas.getContext('2d')
ctx.globalAlpha = 0.5
const img = new Image()
img.src = './run.png'
img.onload = function () {
ctx.drawImage(img, 0, 0)
}
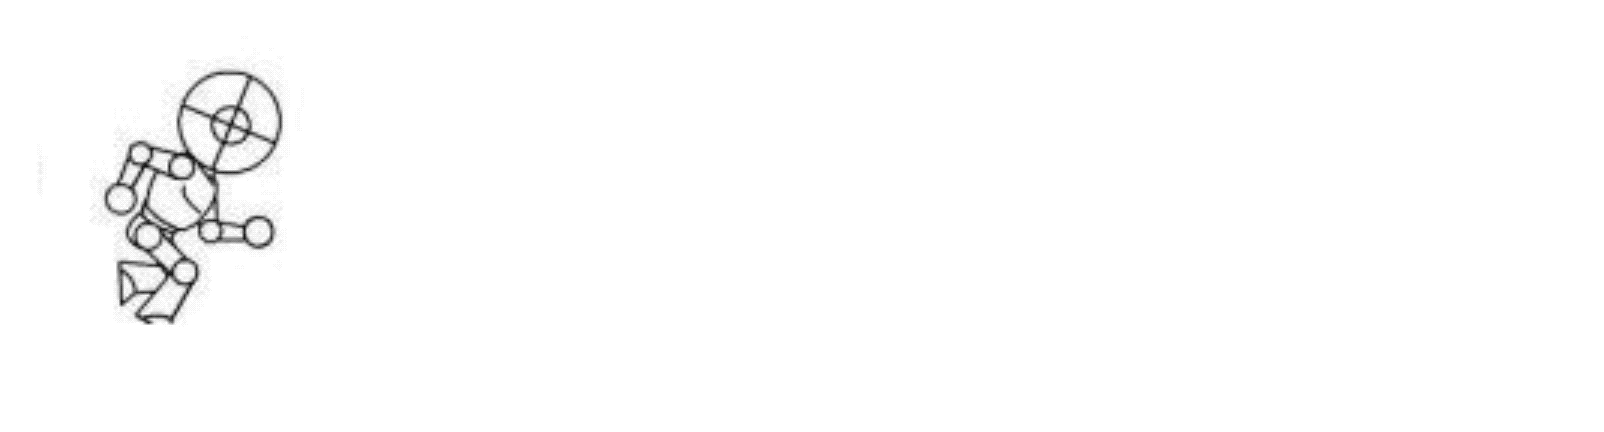
// 图像宽度的计算过程:
// 在使用的素材图片 run.png 中。
// 结合坐标系,估算各个图像的大致坐标范围是 90 ~ 100 的宽度。
// 开发时不断微调,最终确定每个图像的宽度为 94 比较合适。
// 实际上如果图像是负责 UI 的同事丢给你的话,可以直接问他们图像的间隔是多少。
// 比如直接让对方设计成 100 的宽度,这样你就不用自己去估算了。
</script>
</body>
</html>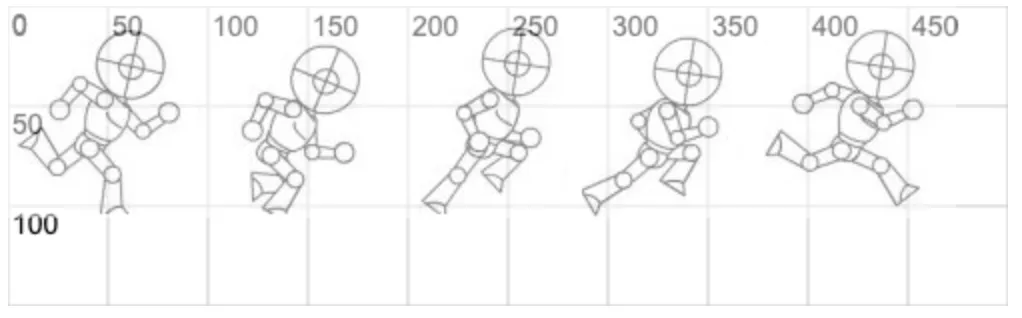
3. 💻 demo2 - 原地跑
html
<!-- 2.html -->
<!DOCTYPE html>
<html lang="en">
  <head>
    <meta charset="UTF-8" />
    <meta name="viewport" content="width=device-width, initial-scale=1.0" />
    <title>📝 实现人物奔跑动画效果</title>
  </head>
  <body>
    <script>
      const canvas = document.createElement('canvas')
      canvas.width = 500
      canvas.height = 500
      document.body.append(canvas)

      const ctx = canvas.getContext('2d')

      const img = new Image()
      img.src = './run.png'
      img.onload = function () {
        let i = 0
        function show() {
          ctx.clearRect(0, 0, 500, 500)
          ctx.drawImage(
            img,
            // 从 (i * 94, 0) 位置开始截取宽度为 94 高度为 img.height 的图片
            i * 94,
            0,
            94,
            img.height,
            // 从 (0, 0) 位置开始绘制宽度为 94 高度为 img.height 的图片
            // 相当于原地奔跑
            0,
            0,
            94,
            img.height
          )
          i++
          if (i == 5) {
            i = 0
          }
        }

        setInterval(show, 1000 / 30) // 调节动画速度
      }
    </script>
  </body>
</html>
4. 💻 demo3 - 向前跑
html
<!-- 3.html -->
<!DOCTYPE html>
<html lang="en">
  <head>
    <meta charset="UTF-8" />
    <meta name="viewport" content="width=device-width, initial-scale=1.0" />
    <title>📝 实现人物奔跑动画效果</title>
  </head>
  <body>
    <script>
      const canvas = document.createElement('canvas')
      canvas.width = 500
      canvas.height = 500
      document.body.append(canvas)

      const ctx = canvas.getContext('2d')

      const img = new Image()
      img.src = './run.png'
      img.onload = function () {
        let i = 0
        let j = 0
        function show() {
          const runDistance = j * 10
          ctx.clearRect(0, 0, 500, 500)
          ctx.drawImage(
            img,
            // 从 (i * 94, 0) 位置开始截取宽度为 94 高度为 img.height 的图片
            i * 94,
            0,
            94,
            img.height,
            // 每次切换图片时,横向位移 10 个单位
            runDistance,
            0,
            94,
            img.height
          )
          i++
          j++

          if (i == 5) {
            i = 0
          }
          if (runDistance >= canvas.width) {
            j = 0
          }
        }

        setInterval(show, 1000 / 30) // 调节动画速度
      }
    </script>
  </body>
</html>