0032. 使用 ctx.createPattern 创建填充图案
1. 📝 简介
- 理解 ctx.createPattern 的填充机制。 需要注意 填充的图案是禁止的,并不会随着我们绘制的图案而移动。
2. 🔗 links
- https://developer.mozilla.org/en-US/docs/Web/API/CanvasRenderingContext2D/createPattern - MDN - CanvasRenderingContext2D: createPattern() method
3. 📒 notes
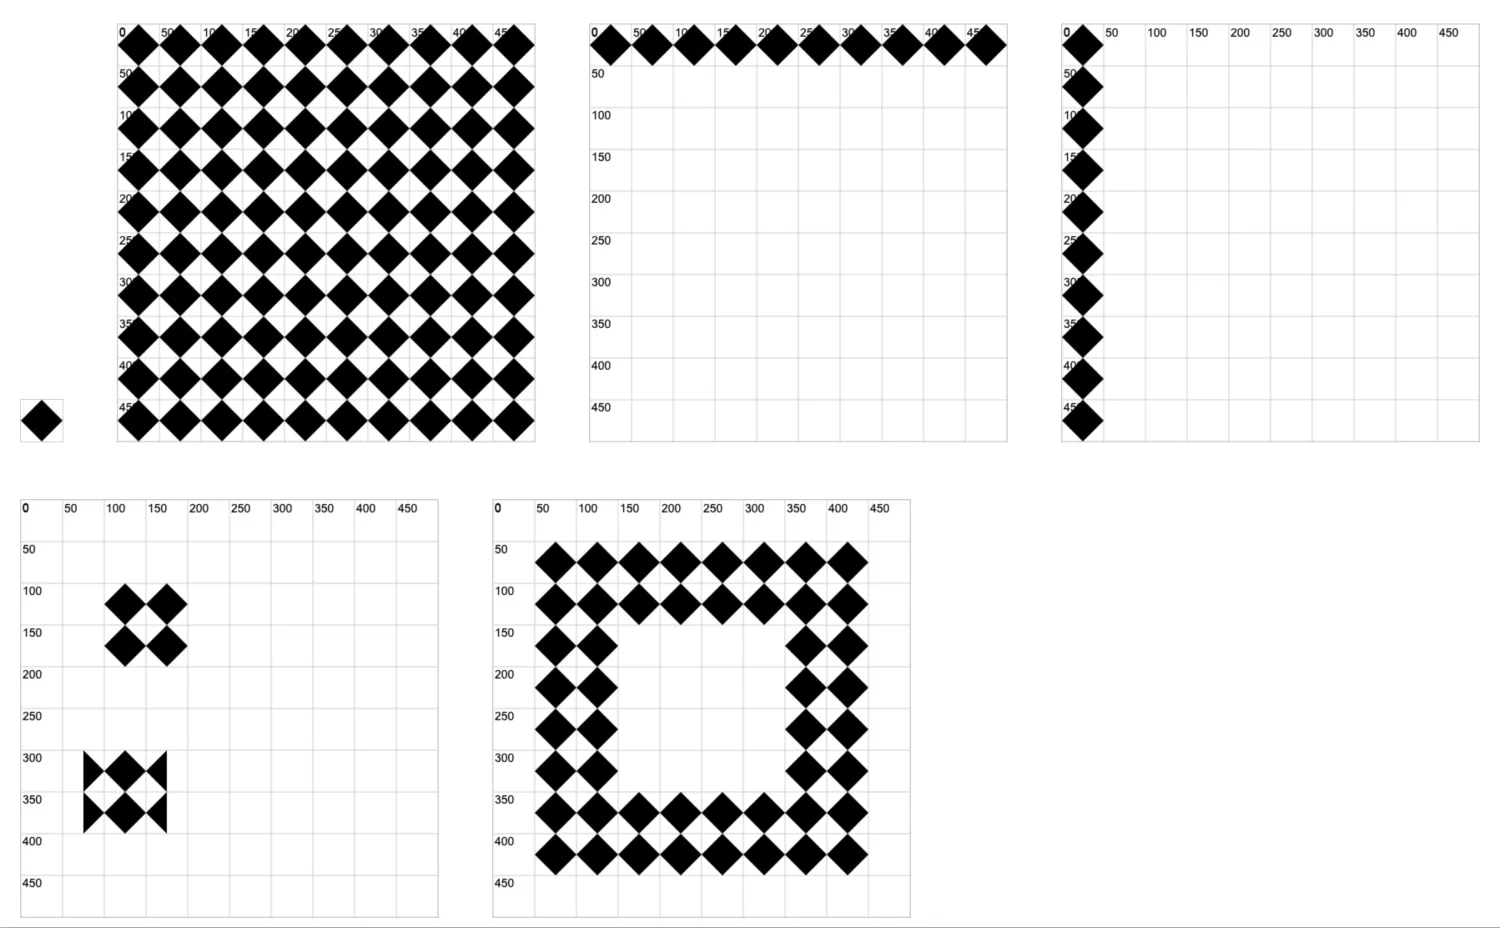
ctx.createPattern 重点在于理解填充的机制,这可能和你常规印象中的填充机制不一样。**填充的图案是禁止的,并不会随着我们绘制的图案而移动。**我们在使用填充的时候,其实是指定哪一块区域可以看到已经准备好的填充图案。如果这块区域看不到填充图案的话,那么填充看起来就是无效的。
4. 💻 demo1
html
<!-- 1.html -->
 <!DOCTYPE html>
<html lang="en">
  <head>
    <meta charset="UTF-8" />
    <meta http-equiv="X-UA-Compatible" content="IE=edge" />
    <meta name="viewport" content="width=device-width, initial-scale=1.0" />
    <title>Document</title>
    <style>
      canvas {
        display: block;
        border: 1px solid #ccc;
        margin: 2rem;
      }
    </style>
  </head>
  <body>
    <script src="./drawGrid.js"></script>
    <script>
      // 提前创建好一个菱形,作为填充素材。
      let rhombus
      {
        rhombus = document.createElement('canvas')
        rhombus.width = 50
        rhombus.height = 50
        document.body.append(rhombus)
        const ctx1 = rhombus.getContext('2d')

        ctx1.moveTo(0, rhombus.width / 2)
        ctx1.lineTo(rhombus.height / 2, 0)
        ctx1.lineTo(rhombus.height, rhombus.width / 2)
        ctx1.lineTo(rhombus.height / 2, rhombus.width)
        ctx1.closePath()
        ctx1.fill()
      }
      // const pattern = ctx.createPattern(imgSource, repetition)
      // 用于创建一个图案来填充图形。

      // imgSource 表示图像源
      // repetition 表示重复机制

      // 创建的图案 pattern 可以作为填充背景或描边背景。
      // ctx.fillStyle = pattern
      // ctx.strokeStyle = pattern

      // 注意:
      // 1. pattern 是基于画布坐标系的原点开始计算的,绝对位置,并不会随着图形的移动而发生变化。
      // 2. ctx.lineWidth 这玩意儿设置的描边宽度,作用到图形上时,分别向两侧扩散 lineWidth / 2 的距离。

      // 一、填充整个画布
      {
        const canvas = document.createElement('canvas')
        drawGrid(canvas, 500, 500, 50)
        document.body.append(canvas)
        const ctx = canvas.getContext('2d')

        ctx.beginPath()

        const pattern = ctx.createPattern(rhombus, 'repeat')
        // 使用 rhombus 来创建一个填充图案 pattern
        // repeat 表示填充整个画布

        ctx.fillStyle = pattern
        // 将 pattern 设置为填充样式

        ctx.rect(0, 0, canvas.width, canvas.height)
        ctx.fill()
      }

      // 二、填充 x 轴
      {
        const canvas = document.createElement('canvas')
        drawGrid(canvas, 500, 500, 50)
        document.body.append(canvas)
        const ctx = canvas.getContext('2d')

        ctx.beginPath()

        const pattern = ctx.createPattern(rhombus, 'repeat-x')
        // repeat-x 表示填充 x 轴

        ctx.fillStyle = pattern
        ctx.rect(0, 0, canvas.width, canvas.height)
        ctx.fill()
      }

      // 三、填充 y 轴
      {
        const canvas = document.createElement('canvas')
        drawGrid(canvas, 500, 500, 50)
        document.body.append(canvas)
        const ctx = canvas.getContext('2d')

        ctx.beginPath()

        const pattern = ctx.createPattern(rhombus, 'repeat-y')
        // repeat-y 表示填充 y 轴

        ctx.fillStyle = pattern
        ctx.rect(0, 0, canvas.width, canvas.height)
        ctx.fill()
      }

      // 四、填充指定区域
      {
        const canvas = document.createElement('canvas')
        drawGrid(canvas, 500, 500, 50)
        document.body.append(canvas)
        const ctx = canvas.getContext('2d')

        ctx.beginPath()

        const pattern = ctx.createPattern(rhombus, 'repeat')
        ctx.fillStyle = pattern

        ctx.rect(100, 100, 100, 100)
        ctx.fill()

        ctx.beginPath()
        ctx.rect(75, 300, 100, 100)
        ctx.fill()
      }

      // 五、填充描边区域
      {
        const canvas = document.createElement('canvas')
        drawGrid(canvas, 500, 500, 50)
        document.body.append(canvas)
        const ctx = canvas.getContext('2d')

        ctx.beginPath()

        const pattern = ctx.createPattern(rhombus, 'repeat')
        ctx.strokeStyle = pattern

        ctx.beginPath()
        ctx.lineWidth = 100
        ctx.rect(100, 100, 300, 300)
        ctx.stroke()
      }
    </script>
  </body>
</html>首先绘制了一个菱形的 icon,这个 icon 用于后续的填充素材。
然后一共绘制了 5 个示例,可挨个展开代码块查看逻辑。
下面是所有示例汇总的最终效果。