0023. 使用 ctx.beginPath 方法对路径进行分组
1. 📝 简介
- 学会使用
ctx.beginPath()对路径进行分组,并了解如果不使用分组的话,会存在什么潜在问题。
2. 📒 notes
需求:
- 先在
(50, 50)位置绘制一个100 x 100的矩形轮廓(轮廓颜色为蓝色) - 再在
(250, 50)位置绘制一个100 x 100的红色矩形
下面我们将通过上述这俩简单的小需求,体验一下 ctx.beginPath() 的作用。
3. 💻 demo1 - 错误写法
html
<!-- 1.html -->
<!DOCTYPE html>
<html lang="en">
  <head>
    <meta charset="UTF-8" />
    <meta name="viewport" content="width=device-width, initial-scale=1.0" />
    <title>Document</title>
  </head>
  <body>
    <script src="./drawGrid.js"></script>
    <script>
      const cavnas = document.createElement('canvas')
      drawGrid(cavnas, 500, 500, 50)
      document.body.appendChild(cavnas)
      const ctx = cavnas.getContext('2d')
      ctx.beginPath()

      // 错误做法:
      ctx.rect(50, 50, 100, 100)
      ctx.strokeStyle = 'blue'
      ctx.stroke()

      ctx.rect(250, 50, 100, 100)
      ctx.fillStyle = 'red'
      ctx.fill()

      // stroke() 或 fill() 默认会对之前所有绘制的路径进行一个处理。
      // 我们可以用 beginPath() 对路径进行分组处理。
      // 如果不分组的话,那么 fill() 或 stroke() 会对之前所有的路径进行处理。

      // 如果没有调用 beginPath(),那么之前的路径会被保留,新的路径会被添加到之前的路径上。
      // 当执行 stroke() 或 fill() 时,会对所有路径进行处理。

      // 如果调用了 beginPath(),那么之前的路径会被清空,新的路径会被添加到空路径上。
      // 当执行 stroke() 或 fill() 时,只会对新的路径进行处理。
    </script>
  </body>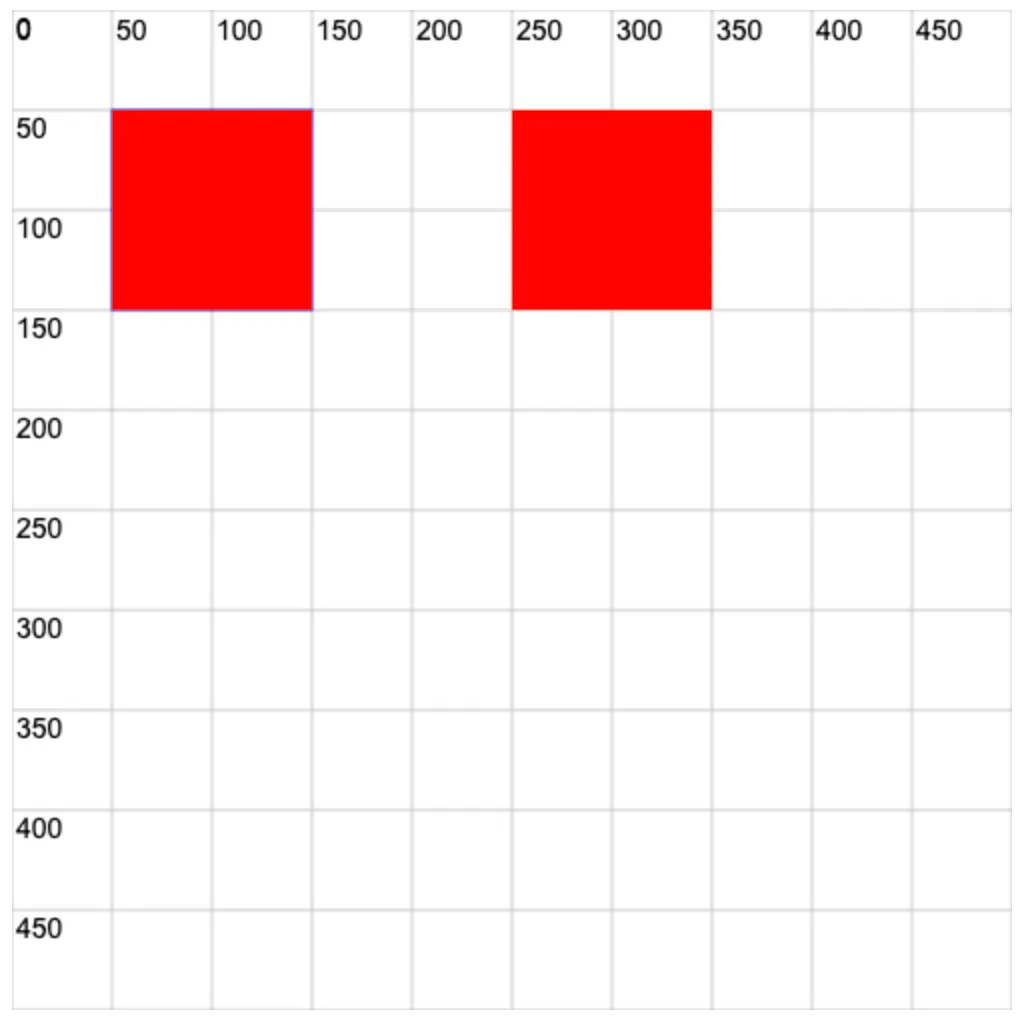
</html>stroke() 或 fill() 默认会对 之前所有绘制的路径 进行一个处理。
这种写法中,在绘制完第一个描边矩形之后,当你绘制第二个填充矩形时,填充将会对之前的路径也起作用。
- 当
ctx.stroke()执行时(50, 50)位置的矩形:加上了蓝色的描边
- 当
ctx.fill()执行时(50, 50)位置的矩形:被填充为了红色(250, 50)位置的矩形:被填充为了红色
4. 💻 demo2 - 正确写法 1
html
<!-- 2.html -->
<!DOCTYPE html>
<html lang="en">
  <head>
    <meta charset="UTF-8" />
    <meta name="viewport" content="width=device-width, initial-scale=1.0" />
    <title>Document</title>
  </head>
  <body>
    <script src="./drawGrid.js"></script>
    <script>
      const cavnas = document.createElement('canvas')
      drawGrid(cavnas, 500, 500, 50)
      document.body.appendChild(cavnas)
      const ctx = cavnas.getContext('2d')
      ctx.beginPath()

      // 正确做法1:
      ctx.rect(50, 50, 100, 100)
      ctx.strokeStyle = 'blue'
      ctx.stroke()

      ctx.beginPath() // 注意,这一行不能少。

      ctx.rect(250, 50, 100, 100)
      ctx.fillStyle = 'red'
      ctx.fill()
    </script>
  </body>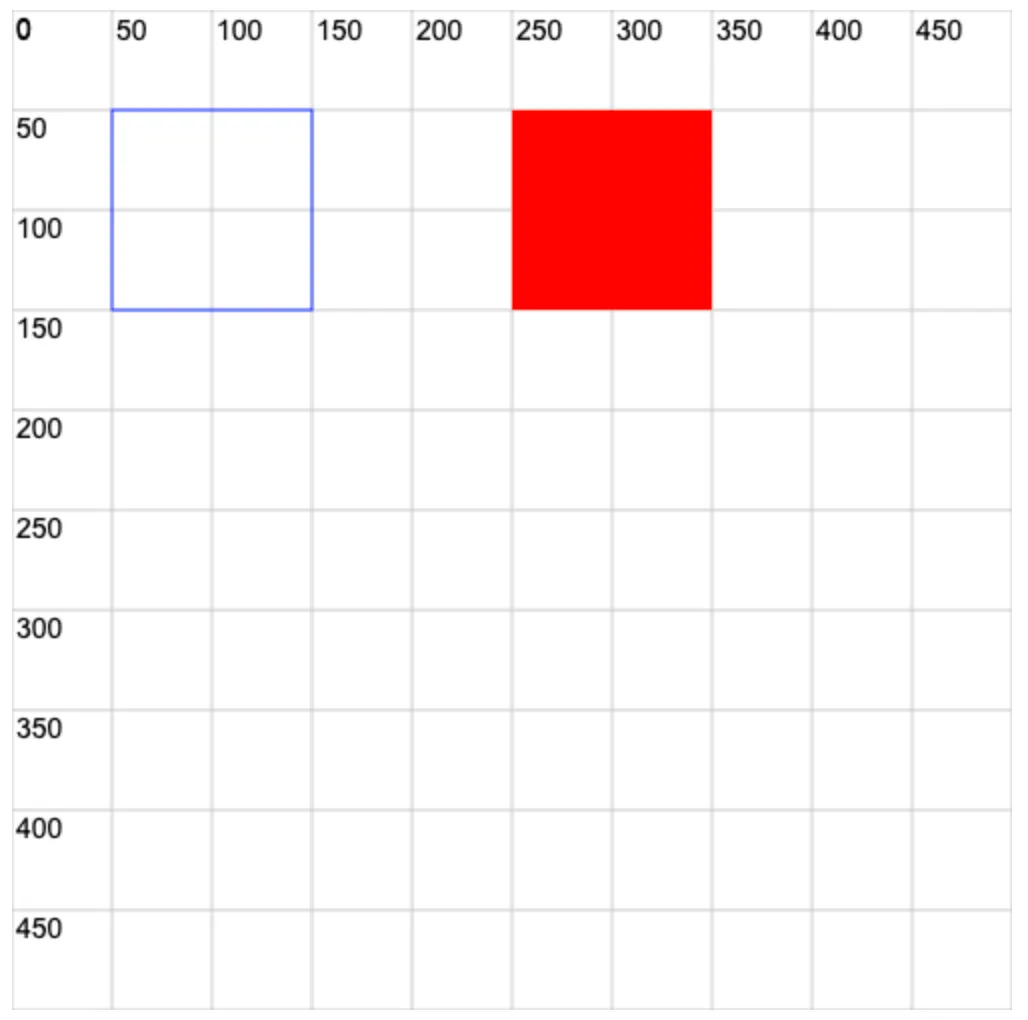
</html>因为在执行 ctx.fill() 之前,调用了 ctx.beginPath(),相当于对路径做了一个分组,这意味着路径重新开始绘制,别再管之前的路径了。
- 当
ctx.stroke()执行时(50, 50)位置的矩形:加上了蓝色的描边
- 当
ctx.fill()执行时(50, 50)位置的矩形:被填充为了红色(250, 50)位置的矩形:被填充为了红色
5. 💻 demo3 - 正确写法 2
html
<!-- 3.html -->
<!DOCTYPE html>
<html lang="en">
  <head>
    <meta charset="UTF-8" />
    <meta name="viewport" content="width=device-width, initial-scale=1.0" />
    <title>Document</title>
  </head>
  <body>
    <script src="./drawGrid.js"></script>
    <script>
      const cavnas = document.createElement('canvas')
      drawGrid(cavnas, 500, 500, 50)
      document.body.appendChild(cavnas)
      const ctx = cavnas.getContext('2d')
      ctx.beginPath()

      // 正确做法2:
      ctx.strokeStyle = 'blue'
      ctx.strokeRect(50, 50, 100, 100)

      // ctx.beginPath()
      // 这里有 or 没有 beginPath() 都可以。

      ctx.fillStyle = 'red'
      ctx.fillRect(250, 50, 100, 100)

      // ctx.fillRect()
      // ctx.strokeRect()
      // 这两个 API 不会受 beginPath 的影响。
      // 因为 strokeRect()、fillRect() 是一个独立的绘制操作,不会受到之前的路径的影响。
    </script>
  </body>
</html>